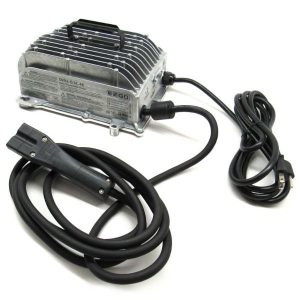
A well-functioning, reliable golf cart charger is essential for operating the cart smoothly and efficiently. Over time, chargers experience wear and tear, which can lead to battery charging failures or reduced performance.
Understanding how to test a golf cart charger is crucial for reducing time and effort on the course. This knowledge helps avoid unnecessary breakdowns and unexpected, expensive repairs or replacements.
This article explains how to test a golf cart charger using different tools and materials. Knowing how to test the charger is essential for troubleshooting issues or conducting routine maintenance, ensuring an optimal experience with your luxury ride.
Why Test A Golf Cart Charger?

Testing a golf cart charger is essential to maintain the performance and health of the cart battery. A faulty charger can cause serious issues such as overcharging and undercharging, which may ultimately harm the battery or golf cart.
Consistent testing can help prevent unplanned repairs and replacements. When testing, using a golf cart charger compatible with your specific model and battery type is beneficial. This will improve the performance and longevity of your golf cart battery, ensuring a smoother ride on the road or course.
6 Easy Steps To Test A Golf Cart Charger
Here are the steps to thoroughly test the battery charger for your E-Z-GO golf cart or current model.
Step 1: Inspect The Charger For Physical Damage
Start by checking your E-Z-GO golf cart charger for visible signs of wear or damage. Look for frayed wires, burnt connectors, or broken components. Ensure the plug and cord are in good condition. Any physical damage could prevent the charger from working correctly.
An in-depth inspection of the charger helps you identify issues earlier, which may reduce the risk of further damage. If you find any damage, it’s essential to replace it quickly or have a professional repair the affected area.
Step 2: Verify The Power Source
Connect the charger to an operational power outlet and verify the power flow. If the charger’s light remains off, try using another device in the outlet to test it. This may suggest that the outlet has problems or that the charger is defective.
A faulty circuit board can reduce charger issues, so always test this rule first. Checking the power supply earlier ensures you’re handling a non-existent issue with your charger.
Step 3: Check The Charger’s Output Voltage
To verify the charger voltage, use a multimeter to check the output voltage from your golf cart charger. Adjust the multimeter to the DC voltage setting and connect it to the charger’s output terminals.
Compare the readings with the expected range for your charger type, such as an E-Z-GO golf cart 36-volt battery charge. Low or no voltage could indicate a faulty charger. Consistent testing with a multimeter helps ensure your charger delivers the proper voltage for effective charging.
Step 4: Test The Golf Cart Batteries
Batteries play a crucial role in the charging process. You can use a voltmeter to measure the voltage of each battery.
Batteries with inconsistent or low voltage might indicate a deeper issue, affecting the charger’s performance. Damaged or depleted batteries can strain your charger, leading to long-term problems. Replacing weak batteries enhances performance and prevents damage to the charger.
Step 5: Monitor The Charging Process
Plug the charger into your golf cart and observe its behavior. If the club car golf cart charger indicator lights don’t turn on, or the charger doesn’t engage, the charger may need repair.
Look for signs such as excessive heat or unusual noises during charging, which may indicate internal issues. Monitoring ensures a smooth charging process and helps identify potential problems before they escalate.
Step 6: Troubleshoot Common Charger Issues
Inspect for loose connections, defective diodes, or broken capacitors. If the 48-volt golf cart charger continues to malfunction, it might require professional service.
Basic repairs can often resolve loose wiring or component failures. However, if issues persist, replacing the charger could prove more cost-effective. Consistent maintenance helps keep your charger reliable and efficient.
Addressing Routine Battery Charger Problems

- Charger Not Powering On: If your E-Z-GO golf cart battery charger isn’t powering on, check the outlet and power cord first. Next, inspect the charger’s fuse or circuit breaker and replace any blown fuses to restore functionality.
- The Charger Activates But Fails to Charge: A golf cart that does not receive a charge may have loose battery connections. Verify that all terminals are clean and tightly secured. Use a golf cart battery tester to check the output voltage.
- Overheating Charger: If a golf cart trickle charger becomes excessively hot, it might be overloaded or have wiring issues. Allow the charger to cool, then inspect it for dust or damage that could block ventilation.
- Charging Indicator Not Lighting Up: If the Club Car charger indicator lights do not light up, verify that the golf cart battery voltage meets the charger’s requirements. Faulty bulbs or sensors inside the charger may also need replacement.
- Charger Stops Mid-Charge: A Yamaha golf cart battery charger that stops abruptly may indicate a damaged battery or a malfunctioning timer. Test the battery with a golf cart tester and recalibrate the timer if needed.
- Batteries Not Reaching Full Charge: If the 36-volt golf cart charger troubleshooting reveals incomplete charging, check the battery charger for sulfation in the batteries. Regular maintenance and equalizing charges can resolve this problem.
When To Seek Professional Help

You should seek professional help repairing golf cart battery charger components if your golf cart charger still won’t charge after a complete inspection and troubleshooting. They can handle all golf cart-related issues quickly and efficiently.
These issues include recurring low-voltage incidents, damage to internal components, and repeated malfunctions, often requiring expert intervention to prevent further damage.
An expert can quickly diagnose problems with a malfunctioning golf cart charger, clubs, or components. Plus, they can handle this issue if your golf cart is overheating or overcharging. Just ensure you address them on time before it’s too late.
Maintenance Tips For Prolonged Charger Life

- You should focus on regularly cleaning the golf cart battery charger and unplugging it from the circuit when fully charged.
- Store the charger in a cool but dry place to prevent moisture buildup and electricity shock.
- Individually check cables and connectors for internal damage or wear and tear to prevent further charging issues.
- Follow E-Z-GO golf cart charging instructions provided by manufacturers to prevent issues later.
- Use a golf cart trickle charger to enhance battery lifespan and storage to avoid deep discharge.
- Focus on regular inspection to inspect issues earlier.
Conclusion
Testing a golf cart battery charger is essential to prevent sudden jerks, jumps, or battery failure later. Inspect your charger thoroughly before connecting to the battery terminals to prevent golf cart battery failure or other issues.
Avoid deep charging or overcharging, and store the charger in a dry but cool environment after use. This is the best way to extend battery lifespan and maintain golf carts’ optimal health and performance.
Do you want to know which charger is compatible with your current golf cart model and how to fix charger issues?
Carts & Parts can help you resolve battery problems. For more details, call (937) 459-8891.
FAQs
How To Test A 12-volt Battery With A Multimeter?
For this, set the multimeter to DC voltage and connect the red wire to the positive terminal. The black wire must connect to the negative terminal. A fully charged 12-volt battery must show a 12.6 volts or more voltage.
Why Won’t My Golf Cart Battery Charge?
This may occur if the charger for your golf cart battery is faulty, the battery terminals have corrosion, or the battery itself is compromised. Inspect the battery terminals, then measure the charger output using a multimeter.
What Should My Golf Cart Charger Read When Fully Charged?
A fully charged golf cart battery pack should read approximately 36 volts for a 36V system or 48 volts for a 48V system. Check the specific voltage requirements for your cart model.