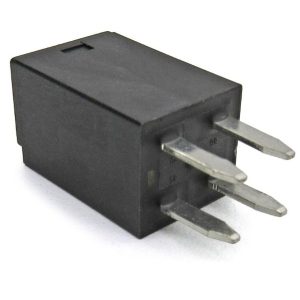
A golf cart solenoid is essential to your cart’s electric system. If you notice that your golf cart is not starting or not even making a clicking sound, this could be a reason for a bad solenoid.
Knowing how to test a gold cart solenoid to obtain optimal performance is essential.
This small device controls the flow of electricity from the battery to the motor. Testing it is simple but essential and can help you determine whether to replace it.
This guide will walk you through the testing steps in detail. You can quickly resolve the issue with some knowledge and the right tools.
What Is A Golf Cart Solenoid?

A golf cart solenoid is a vital electronic component that switches between the battery and the motor. Its primary purpose is to provide power to the golf cart. When drivers press the accelerator pedal, the solenoid sends signals to the motor.
After that, electricity starts flowing, which helps the cart start moving.
If it’s not running or starting, it makes clicking sounds without engaging the engine.
Although all golf cart solenoids work similarly, they aren’t identical. Their differences can be seen based on voltage, amperage, and brand compatibility. Applying a golf cart solenoid test helps find issues early, saving time and money on repairs and replacements.
If testing a specific model such as Yamaha and E-Z-GO, ensure it functions properly. Regular inspection and timely replacement keep your golf cart’s electric system running smoothly.
Where Is The Solenoid On A Golf Cart?
The solenoid is placed under your cart’s seat near the battery and the controller. In some electric golf carts, it’s usually found near the motor or the forward and reverse switch. In gas golf carts, it’s visible near the starter generator.
Its accurate placement depends on brands like E-Z-GO, Club Car, and Yamaha.
If you want it to test the golf cart solenoid process, it will help determine whether it’s working perfectly or needs replacing.
How To Test A Solenoid Golf Cart

If you want to inspect the condition of a golf cart solenoid DIY thoroughly, you can do this with the right tools and knowledge. Below are some steps that you need to follow to test it:
1. Turn Off The Golf Cart
Before moving to test the solenoid of a golf cart, it’s essential to turn off the golf cart from the circuit and remove the key from the ignition. Also, remove the battery from the terminals to prevent accidental shocks or jerks.
If you are working on a 48v or gas golf cart solenoid, be extra careful around the generator and fuel system.
2. Check For Clicking Sounds
Now, enter the ignition system key and press the accelerator. A good and operational solenoid makes a distinct noise. If you notice that the golf cart solenoid is not clicking, it indicates an issue with the solenoid itself or the wiring.
3. Use A Multimeter To Test Voltage
Next, a multimeter is used to test the DC voltage. Place it on the probes of the large terminals of the solenoid. When you press the pedal, ensure the voltage should match the golf cart’s battery voltage (12V, 36V, and 48V).
If it shows no reading, there might be an issue with the battery and writing. You can test the E-Z-GO solenoid model with additional wiring connections. This step is highly recommended for golf cart solenoid tests over all models.
4. Perform A Continuity Test
Set the solenoid to continuity ohms (Ω) settings. Touch the probes to its small terminals. When an accelerator is pressed, ensure it shows a 0-1 ohm continuity to know it works correctly. If it shows infinite continuity, the solenoid is likely damaged and needs to be replaced.
This step is crucial for higher-voltage models like the 48v golf cart solenoid. This test helps determine whether the solenoid is the root cause of the golf cart’s malfunction.
5. Bypass The Solenoid For Further Testing
If you still can’t find the main issue, consider temporarily bypassing the golf cart solenoid. Ensure that you connect the two large terminals with a screwdriver and wrench.
If the cart moves after this step, it indicates that the solenoid needs to be replaced. You can hire a professional golf cart technician to handle this specific issue.
6. Replace Or Repair The Solenoid If Needed
If the golf cart solenoid fails any of these tests, replacing it is the best solution. Ensure you get the correct solenoid for your golf cart model, whether a 48v golf cart solenoid or a specific type like a Yamaha solenoid test to verify compatibility.
Electric Golf Cart Faulty Solenoid Symptoms

To know if your solenoid is bad, below are some signs that you should consider for it:
- Golf Cart Won’t Start: When you press the pedal, the golf cart doesn’t start moving. This is because it doesn’t power your cart, or the wiring may be faulty.
- No Click When Pressing the Accelerator: A healthy solenoid doesn’t click when you press the pedal. If there is no clicking sound, it is not engaging, or the wiring system contains a fault.
- Repeated Clicking Sounds: A solenoid that continuously provides a clicking sound without engaging correctly. It means it has a loose connection, corroded terminals, or an internal components breakdown issue. Doing a Yamaha, E-Z-GO, and club car solenoid test may help indicate the problems early.
- Inconsistent Acceleration: If your golf cart hesitates, surges, and suddenly loses its power, the solenoid does not maintain a steady electrical connection, leading to an uneven driving experience on the road or the golf course.
- Burning Smell or Overheating: if you notice a smell or overheating issue when touched, the solenoid is failing. It happens only when the high speed of current contact wears out and starts creating resistance.
- Battery Drains Faster Than Usual: A bad solenoid may not fully disconnect when the cart is off. It slowly drains the golf cart battery. If the battery loses its charger overnight, then solenoid may be the reason.
- Sparks or Smoke Near the Solenoid: If you notice a spark or smoke at the solenoid terminals, it can cause an electric shock or excessive heat build-up. Ignoring this can lead to more severe wiring problems.
Maintenance Tips To Extend Solenoid Life

- Check battery connections regularly to prevent power loss and solenoid damage.
- Keep solenoid terminals clean to avoid corrosion and electrical resistance.
- Tighten loose wires to ensure a solid electrical connection.
- Avoid overloading the golf cart to reduce solenoid wear.
- Perform routine golf cart solenoid tests for early fault detection.
- Replace worn-out solenoids before they cause starting issues.
- Ensure proper voltage compatibility when installing a new solenoid
Conclusion
Testing is a golf cart solenoid for optimal performance and results are essential to running smoothly on the golf course. Inspecting and testing it DIY is an easy process. You need to pay attention to it and follow each step.
Ensure that your golf cart is maintained weekly or after each use so that you can find issues early and on time without compromising your ride or game.
At Carts & Parts, we are experienced golf cart service providers. We sell a range of carts and their parts and accessories. We can supply a solenoid for any model. Contact us at (937) 459-8891 for further information.
FAQs
How To Test A 36V Golf Cart Solenoid?
When testing a 36V golf cart solenoid, use a multimeter to check the voltage. It’s faulty because it shows no voltage and no clicking sound.
Can You Test A Solenoid With A Screwdriver?
Yes, you can. To bypass the solenoid, touch both larger terminals with a screwdriver. If it moves, it indicates a bad solenoid, which can even spark a pause.
How Often Does A Golf Cart Solenoid Go Bad?
Solenoids usually last more than 4 to 6 years. But they fail quickly if used continuously and have corrosion or electrical overload.
Can Weather Impact Solenoid Functionality?
Cold stiffens the solenoid coil, heat causes overheating, and moisture leads to corrosion, weakening electrical connections.
How Do I Set My Multimeter To Check The Solenoid’s Resistance?
Set the multimeter to ohms (Ω) and test the small terminals. Low resistance means it’s working; no reading or high resistance indicates failure.
What Voltage Should I Expect When Testing The Solenoid?
For a 36V solenoid, expect voltage matching the battery pack when pressing the accelerator. Zero or low voltage signals a faulty solenoid.